
How to Set Up a Brooder for Day-Old Chicks: A Complete Guide for Poultry Farmers
Starting with healthy day-old chicks is one of the most important steps toward successful poultry farming. However, even high-quality chicks need proper care during their first weeks of life. A well-prepared brooder provides the warmth, protection, feed, water, ventilation, and hygiene chicks need to grow into strong and productive birds.
For poultry farmers in Uganda, understanding how to set up a brooder for day-old chicks can help reduce chick mortality, improve growth, and create a strong foundation for profitable poultry production. This guide explains everything you need to know before bringing your chicks home.
What Is a Brooder?
A brooder is a prepared space where young chicks are kept during the first few weeks of life. It provides artificial warmth because day-old chicks cannot regulate their body temperature effectively.
A good brooder should protect chicks from cold, excessive heat, predators, drafts, wet litter, and diseases. It should also provide easy access to clean water and feed.
Depending on the type of poultry, chicks generally require brooding during their early weeks, with temperature gradually reduced as they develop feathers and become better able to regulate body heat.
How to Prepare a Brooder for Day-Old Chicks
Before buying or receiving your chicks, prepare the brooder completely. Never wait until the chicks arrive before installing equipment and heating the brooder.
1. Choose a Suitable Brooding Room
Select a clean, dry, secure, and well-ventilated room. The brooder should be protected from rain, strong winds, predators, and excessive cold.
The room should have enough space for the number of chicks you intend to keep. Overcrowding can increase stress, competition for feed and water, poor ventilation, and disease transmission.
Avoid using a room that has recently housed sick birds unless it has been thoroughly cleaned and disinfected.
2. Clean and Disinfect the Brooder
Before introducing chicks, thoroughly clean the floor, walls, feeders, drinkers, and other equipment.
Remove old litter, manure, dust, feathers, and other organic material. Wash equipment with appropriate cleaning agents before applying a suitable poultry disinfectant.
Allow the brooder to dry properly before adding fresh bedding.
Good brooder hygiene is essential because young chicks have developing immune systems and can be highly vulnerable to infections.
3. Put Down Good Quality Litter
Cover the brooder floor with clean, dry absorbent bedding. Materials such as wood shavings can be used where available.
The litter should not be dusty, moldy, wet, or contaminated with chemicals. Wet litter can encourage bacterial growth and contribute to respiratory and other health problems.
Check the litter every day and remove wet or heavily contaminated sections.
4. Install a Reliable Heat Source
Heat is one of the most important requirements for day-old chicks.
Depending on the size of your flock and available resources, farmers may use suitable electric brooders, gas brooders, infrared lamps, or other safe heating systems.
The heat source should provide an even warm area without creating a fire hazard.
As a general starting point, many chicks require a brooding temperature of around 32–35°C during the first week, measured at chick level. The temperature can then be gradually reduced as chicks grow and develop feathers.
Always follow the recommendations for your specific breed and the guidance of a qualified poultry professional.
5. Observe the Chicks’ Behaviour
A thermometer is useful, but chick behaviour is also an important indicator of whether the brooder is comfortable.
If chicks crowd directly underneath the heat source and make loud distress calls, they may be too cold.
If chicks move far away from the heat source, pant, or appear excessively spread out, they may be too hot.
When the temperature is appropriate, chicks should be relatively evenly distributed throughout the brooding area, actively eating, drinking, and resting.
6. Provide Adequate Ventilation
A brooder needs fresh air, but chicks should not be exposed to direct cold drafts.
Good ventilation removes excess moisture, dust, carbon dioxide, and harmful gases while maintaining comfortable temperatures.
Do not completely seal the brooder room in an attempt to keep it warm. Poor ventilation can create serious respiratory problems.
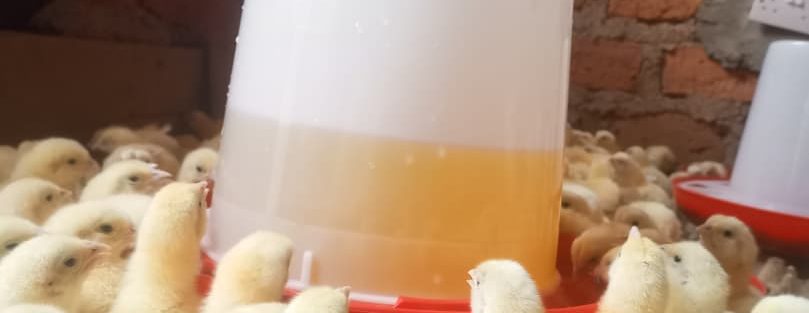
7. Install Feeders Before the Chicks Arrive
Provide enough feeders so that all chicks can access feed without excessive competition.
Use a quality chick starter feed formulated for the age and type of birds you are raising.
Place feeders where chicks can easily find them and keep them clean. Avoid filling feeders excessively because spilled feed can attract rodents and contribute to wastage.
8. Provide Clean Drinking Water
Fresh, clean drinking water should be available immediately when chicks arrive.
Use clean drinkers that are appropriate for young chicks. Position them so chicks can easily access the water without climbing into the containers.
Wash drinkers regularly and replace dirty water immediately.
During the first days, farmers should pay close attention to whether all chicks are drinking properly.
9. Make the Brooder Secure
A brooder should protect chicks from rats, cats, dogs, snakes, and other predators.
Inspect doors, windows, walls, and openings before introducing chicks. Repair holes and gaps that could allow predators or rodents to enter.
A simple brooder guard can also help keep chicks close to the heat source during the first days.
10. Prepare Before the Chicks Arrive
Turn on the heating system before the chicks arrive so the brooder reaches the appropriate temperature.
Check:
Heat source
Temperature
Feeders
Drinkers
Litter
Ventilation
Lighting
Brooder guard
Security
Cleanliness
Having everything ready reduces stress and allows chicks to settle quickly.
Common Brooding Mistakes to Avoid
Several mistakes can lead to poor chick growth and high mortality.
Overcrowding
Too many chicks in a small brooder increase competition, stress, poor ventilation, and disease risk.
Poor Temperature Management
Both overheating and chilling can negatively affect young chicks. Monitor temperature regularly and observe chick behaviour.
Dirty Water and Feeders
Contaminated drinking water and dirty equipment can spread infections quickly.
Wet Litter
Wet bedding should be removed promptly. Investigate leaking drinkers and poor ventilation if litter remains damp.
Poor Ventilation
Keeping the room completely closed may retain heat but can result in poor air quality.
Inadequate Preparation
Receiving chicks before the brooder is ready is a common mistake. Prepare and test the entire system before delivery.
How Long Should Chicks Stay in a Brooder?
The brooding period varies according to breed, weather, housing conditions, and chick development. In many poultry systems, chicks are brooded for approximately 3–6 weeks, with heat gradually reduced as they develop feathers.
During colder weather, chicks may require supplemental heat for longer.
The important principle is not simply to follow a fixed number of days but to monitor the chicks’ development, behaviour, and environmental conditions.
Why Proper Brooding Matters
Proper brooding gives chicks a strong start. Good temperature control, nutrition, clean water, hygiene, ventilation, and protection can contribute to:
Lower chick mortality
Better feed consumption
Improved growth
Stronger immunity
Reduced disease risks
More uniform flock development
Better future productivity
For farmers investing in broiler farming, layer farming, Sasso, Kuroiler, or other poultry breeds, good brooding practices should be treated as an essential part of the production plan.
Get Quality Day-Old Chicks and Poultry Support from Aaron Vet Farms Ltd
Setting up a brooder correctly is only one part of successful poultry farming. Farmers also need quality chicks, appropriate feeds, vaccination planning, biosecurity, and proper flock management.
Aaron Vet Farms Ltd supports poultry farmers with quality day-old chicks, poultry feeds, veterinary services, and professional poultry farming guidance.
Whether you are starting a small poultry project or expanding a commercial farm, proper preparation before your chicks arrive can make a significant difference.
Contact Aaron Vet Farms Ltd for guidance on day-old chicks in Uganda, poultry management, feeds, and veterinary services.
Conclusion
Learning how to set up a brooder for day-old chicks is essential for every poultry farmer. A successful brooder should provide the right temperature, clean bedding, adequate ventilation, safe housing, quality chick starter feed, and clean drinking water.
Prepare the brooder before the chicks arrive, monitor their behaviour daily, maintain excellent hygiene, and gradually adjust conditions as the chicks grow. A strong start during the brooding period can help create a healthier and more productive flock.